
Background of the Invention
Traditional intravenous cannulation involves inserting a hollow needle through a flexible cannula, advancing the cannula into the blood vessel using the index fingure, and subsequently withdrawing the needle. This manual process demands significant precision and experience and carries a high risk of needle-stick injuries to healthcare workers.
The reason doctors and nurses fail to place the cannula in the lumen of the blood vessels is because the user moves the tip of the needle forward puncturing the dorsal wall and placing the cannula below the vessel known as “Double Puncture”, or withdrawing the needle before the tip of the cannula enters the lumen of the blood vessel. This occurs because the cannula manufacturers increased the distance between the tip of the needle to the tip of the cannula to reduce the traumatic pain that occurs when puncturing the skin of the patient.
When using a “Safety Cannula” users fail to place the cannula in the lumen is because they press the button placed on the top to withdraw the needle into the body prematurely, so often place the cannula on the top of the blood vessels.
The technique is further challenged in emergency, infectious, or high-pressure environments. The user is expected to apply the biocide to sterilize the skin and wait for 2 minutes to make sure the bacteria, fungus on the skin are dead. Unfortunately, the users may sterilize the skin properly in the first attempt, but fail to observe this guideline because the user, and the patient start getting anxious and so fail multiple occasions. On average users need 3.3 cannula for each patient, and so the cost of cannulation and time taken to place the cannula successfully increases along with polluting the environment by disposing contaminated waste in the environment.
The inventor and designer of this innovation encountered infection of MRSA (Methicillin Resistant Bacterial Infections) from 1984 – 1990. He was observing doctors, and nurses inserting cannula, urinary catheters, and multiple endotracheal intubations were associated with itrogenic infections that killed premature babies in the neonatal units, and intensive care.
Earlier innovations, including the inventor’s prior patent (US5338306), introduced spring- or gas-powered mechanisms to automate cannula advancement. While effective in improving insertion speed, these devices presented challenges related to mechanical complexity, manufacturing costs, and post-use safety.
The present invention—Venaican—addresses these limitations through a redesigned mechanism that eliminates the need for automatic needle retraction. The device incorporates a manually-controlled plunger mechanism that holds a cannula preloaded over a needle. Upon confirmation of blood flashback in the transparent chamber, the user releases a restrainer lock, allowing the plunger to gently advance the cannula into the vein.
No spring is used for needle retraction, thereby avoiding premature withdrawal of the needle, a common issue in many spring-based safety cannulas that can lead to failed cannulation.
Importantly, the needle attached to the blood chamber is manually retracted by the user after the cannula has been successfully positioned in the vein. This separation of cannula advancement and needle retraction ensures that control remains with the operator, significantly reducing the risk of cannulation failure and improving patient outcomes.
Peripheral vein cannulation is the most common minor surgical procedure performed by doctors, nurses, and phlebotomists. This simple method of obtaining vascular access to administer drugs, fluids, nutrition, and blood is often performed numerous times in hospitals.
Equipment and trained personnel are available, and some use ultrasonographic guidance, special lights and other gadgets to facilitate peripheral vein cannulation, especially of deep, nonpalpable veins.
Indications for Peripheral Vein Cannulation
- Administration of IV fluids and drugs
- Repetitive venous blood sampling
Contraindications to Peripheral Vein Cannulation
Absolute contraindications
- Infected skin increase risk of sepsis
Relative contraindications
- Planned use of very concentrated or irritating IV fluids: Use a central venous catheter or intraosseous infusion
- Infection or burned skin at a prospective cannulation site
- Injured or massively edematous extremity
- Thrombotic or phlebitic vein
- Arteriovenous graft or fistula
- Ipsilateral mastectomy or lymph node dissection
- Use another site (eg, the opposite arm) in the above situations.
Complications of Peripheral Vein Cannulation
Complications are uncommon and include
- Local infection
- Venous thrombophlebitis
The above complications can be reduced by using sterile technique during insertion and replacing or removing the catheters within 72 hours.
Other complications include
- Extravasation of infused fluids into surrounding tissues
- Arterial puncture
- Hematoma or bleeding
- Damage to the vein
- Nerve damage
- Air embolism
- Catheter embolism
Equipment for Peripheral Vein Cannulation
- Skin-cleansing materials: Alcohol, chlorhexidine, or povidone-iodine swabs or wipes
- Nonsterile gloves
- Tourniquet, single-use
- IV catheter, typically 18- or 20-gauge for routine infusions in adults (14- or 16-gauge for high-volume injection) and 22- or 24-gauge in infants and small children
- IV infusion set (eg, IV solution bag, hanger, tubing) or saline lock
- Dressing materials (eg, tape, gauze, scissors, transparent occlusive dressing)
Optional equipment includes
- Vein-finder device (eg, infrared vein viewer, ultrasonography device)
- Local or topical anaesthetic (standard for children): (eg, injectable 1% lidocaine without epinephrine, needle-free lidocaine gas-injector, a mixture of lidocaine, epinephrine, and tetracaine gel, or lidocaine/prilocaine cream)
- Immobilization board and stockinette, for use if the catheter is inserted over a joint
Additional Considerations for Peripheral Vein Cannulation
- Chlorhexidine hypersensitivity: Cleanse the skin using a different disinfectant.
- Latex hypersensitivity: Use latex-free gloves and a tourniquet.
- A sterile field is usually not needed for peripheral venous cannulation. However, sterile (ie, aseptic or aseptic no-touch) technique should be followed.
- Peripheral IV catheters should not overlie a joint (e.g., the antecubital fossa) unless other sites are unavailable. Joint motion will kink the catheter and be uncomfortable. An immobilization board can help prevent the joint from flexing if such a site must be used.
Relevant Anatomy for Peripheral Vein Cannulation
- Peripheral veins are most easily cannulated in a straight segment proximal to the junction of 2 tributaries.
- A tortuous vein segment may be difficult to cannulate, and venous valves may impede catheter insertion.
- In general, cannulate more distal veins first; as the distal sites are exhausted, more proximal sites are used.
- Upper extremity cannulation sites are the most durable and convenient and are less likely to have complications such as thrombophlebitis. Therefore, use the lower extremity or the external jugular veins only if suitable upper extremity veins are unavailable.
Positioning for Peripheral Vein Cannulation
Rest the body part being cannulated on a comfortable surface and adjust the position to expose the site optimally.
For the external jugular vein, place the patient in the Trendelenburg position with the head tilted slightly contralaterally.
How To Insert a Peripheral IV
Identify and prepare the site.
- Do a preliminary inspection (nonsterile) to identify a suitable vein: Apply a tourniquet, have the patient make a fist, and palpate using your index finger to locate a large-diameter vein that is nonmobile and has good turgor.
- To help distend and locate veins, tap a potential site with your fingertips. It may help to allow the arm to hang down, increasing venous pressure, and/or apply a warm compress. Use a vein-finder device if a suitable vein is not readily seen or palpated.
- After identifying a suitable cannulation site, remove the tourniquet.
- Apply topical anaesthetic if used, and allow adequate time for it to take effect (eg, 1 to 2 minutes for gas injector, 30 minutes for topical).
- Prepare the IV infusion setup or the saline lock equipment.
- Wear gloves.
- Cleanse the skin site with antiseptic solution, beginning at the needle-insertion site and making several outwardly expanding circles.
- Observe "Drying Time" Allow 1-2 minutes for the antiseptic solution to dry completely.
Insert the peripheral venous catheter.
- To test the cannula, hold the hub of the Cannula and slightly rotate it about the needle to ensure smooth movement. Do not slide the needle in and out of the Cannula.
- Reapply the tourniquet.
- Hold the area steady with your nondominant hand and use your thumb to apply gentle traction to the vein distal to the needle-insertion site to prevent it from moving. Traction may not be necessary for larger forearm or antecubital fossa veins.
- Hold the cannula between your dominant hand's thumb and index finger with the needle bevel facing up.
- Tell the patient that the needlestick is about to happen.
- Insert the needle in the skin at a shallow angle (10 to 30 degrees) about 1 to 2 cm distal to where you intend to enter the vein.
- Advance the cannula into the vein using a slow, even motion. When the needle tip enters the lumen, blood will appear in the flash chamber of the cannula (called a flash of blood), and you may feel a pop as the needle punctures the vein's wall. Stop advancing the cannula.
- If no flash appears after 1 to 2 cm of insertion, withdraw the cannula slowly. If it had initially entirely passed through the vein, a flash may occur as you withdraw the needle tip back into the lumen. If a flash still does not appear, withdraw the cannula almost to the skin surface, change direction, and try again to advance it into the vein.
- If rapid local swelling occurs, blood or fluid is extravasating. Terminate the procedure: Remove the tourniquet and the cannula, and apply pressure to the puncture site with a gauze pad (a minute or two is usually adequate unless the patient has a coagulopathy). Choose a different site for any subsequent attempts.
Advance the catheter into the vein.
- Keeping the needle tip motionless within the lumen, carefully lower the cannula to better align it with the vein, and advance it an additional 1 to 2 mm to ensure that the tip of the plastic catheter has also entered the vein. This step is done because the needle tip slightly precedes the catheter tip.
- Hold the needle steady and slide the entire length of the plastic catheter over the needle and into the vein. The catheter should slide easily and painlessly. Remove the needle.
- If resistance or pain occurs, assume the catheter is not in the vein. In most cases, you must stop the attempt and start over at a new site. Holding the catheter hub motionless, remove the needle and slowly and gradually withdraw the catheter while watching the hub. If blood flows from the hub, stop withdrawing the catheter and try again to advance it. If no blood appears, continue to withdraw the catheter slowly. Apply a dressing over the area with gentle pressure when the catheter has been removed.
- Occasionally, the catheter is in the lumen of the vein but cannot be advanced because it pushes against a valve or a sharp turn. To help the catheter pass through a valve, advance it while flushing it with fluid from a syringe or IV tubing. To help the catheter negotiate a tortuous vein, manually apply gentle distal traction to the vein to straighten it, and then try to advance the catheter.
- Once the catheter is successfully placed, withdraw any blood needed for laboratory testing, remove the tourniquet, place some gauze underneath the hub, apply fingertip pressure to the skin proximal to the catheter tip (to compress the vein and limit blood loss from the hub), and connect the IV infusion or saline lock.
The problem in cannulation successfully is not difficulty to find veins, it’s not the thickness or the rolling of vein but occurs after the user punctures the vessels. The user retract the needle instead of moving the cannula forward and so the cannula that has not eneterd the lumen of the vein is placed above the vein known as “Pre-mature Withdrawal”, orpush forward the needle resulting in what is called as “Double Puncture” – placing cannula below the vein or artery resulting in local swelling known as “Extra vessation”.
Begin the IV infusion/establish the saline lock.
- Attach the end of the IV tubing or the saline lock to the catheter hub.
- Begin the infusion or flush the saline lock (inject about 5 ml of saline in rapid, small pulses). Fluid should flow freely.
- If fluid extravasates or does not flow freely, remove the catheter, apply a dressing over the area with gentle pressure, and insert a new catheter at another site.
Dress the site
- Wipe all blood and fluid from the site, careful not to disturb the catheter.
- Cover the catheter with a transparent occlusive dressing.
- Loop the IV tubing (or saline lock tubing) and tape it to the skin away from the IV insertion site, to help prevent accidental traction on the tubing from dislodging the catheter.
- Write the date and time of IV cannulation on the dressing.
- Apply an immobilization board as necessary.
Aftercare for Peripheral Vein Cannulation
- Replace or remove catheters within 72 hours of placement.
- Observe for swelling at the entry of cannula.
- Observe discoloration around the area, and pain
- Only 50% of cannula enter the vein, rest is in dermis, sub dermis and skin, so slight movement of arm, can dislodge the cannula.
It's Time to Move Beyond "Safety Cannula"—Introducing Venaican:
The First True Innovation in Cannulation Since 1954
It’s time for manufacturers, regulators, and healthcare providers to look beyond hollow promises. It’s time for Venaican—a spring-loaded, self-introducing IV cannula that prioritizes patient comfort, clinical efficiency, and infection control.
What is a Safety IV Cannula—and What Isn’t It?- The Safety IV Cannula was introduced primarily to reduce needle-stick injuries, a legitimate concern for healthcare workers. The FDA backed its use in the USA, and it has since become standard in many countries. At its core, it’s a regular IV cannula with a safety clip (SIP – Sharps Injury Protection) that retracts or shields the needle after insertion.
- This safety mechanism is helpful, but let’s be clear: it only protects after the damage is already done. The insertion technique—the act of getting the cannula into the vein—remains unchanged since 1954.
- Here’s what that means in practice:
- Multiple failed attempts to access a vein.
- Trauma to patients, especially children, the elderly, or the dehydrated.
- Increased risk of infection with every failed attempt.
- Emotional and physical exhaustion for healthcare staff.
- Yet none of these are addressed by the so-called "safety" cannula.
- During the Ebola epidemic and most recently during the COVID-19 pandemic, frontline doctors wearing PPE struggled to cannulate dehydrated, collapsed veins. Repeated pricks and failures led to poor outcomes and suffering—not because of bad doctors, but because the tools had failed them.
- Ensure successful vein entry on the first attempt.
- Eliminate the need for high skill levels, allowing even non-doctors to use it safely in emergencies.
- Reduce trauma, infection risks, and delays in critical care.
- Unlike the Safety Cannula, which only protect healthcare workers acts after insertion, and has no true benefit, but expensive for patients, and healthcare workers.VenaiCan transforms the insertion process, reduce cost, and environmentally friendly.
Let’s not ignore the commercial history: The safety cannula was heavily patented and monopolized by manufacturers to maintain market dominance, not necessarily to advance patient care. By focusing only on post-use safety, they avoided real innovation while capturing global markets through regulatory influence.
But now, that monopoly is hurting us. We're overdue for a product that doesn’t just protect after cannulation, but ensures the cannula is successfully introduced without trauma in the first place.
The Future of Cannulation: Patient-Centered, Not Patent-Driven
VenaiCan is not just a medical device—it’s a revolution in how we treat patients, especially the most vulnerable. It empowers:Patients to self-cannulate during emergencies.
Healthcare workers to operate under pressure without stress.
Systems to reduce iatrogenic infections and mis-cannulations.
Let’s not settle for half-solutions anymore. The world needs real innovation, not marketing jargon.
Call to Action
I urge manufacturers, hospital procurement heads, and medical innovators to stop glorifying outdated safety devices and start supporting first-attempt success, real infection prevention, and trauma-free cannulation.
Let’s evolve. Let’s build. Let’s make VenaiCan the new global standard.
Join us in putting patients first—where they belong.
Problem with Current Practice
Despite published evidence supporting spring-loaded cannula introducers—such as the article "Cannulation of Vessels Using a Spring-Loaded Device" (Anesthesia & Analgesia, Dec 1992; 75(5):867-8. DOI:10.1213/00000539-199211000-00055s)—manufacturers of intravenous and arterial cannulas have refused to adopt such innovations. The stated concern was that automation would "de-skill doctors," prioritizing investor interests over patient and provider safety. As a result, no substantial effort has been made to simplify cannulation for clinicians, nurses, or paramedics.
During the Ebola epidemic in West Africa, this gap proved fatal. The inability to insert an IV cannula on the first attempt led to prolonged patient contact and direct exposure to highly contagious bodily fluids. Many patients died because IV access could not be secured in time to administer rehydration fluids and life-saving medications. Tragically, more than 50% of those who died were healthcare workers themselves—victims of outdated tools and preventable infection.
Urgency of Innovation
Global health bodies, including the World Health Organization (WHO) and the Centers for Disease Control and Prevention (CDC), have warned that future pandemics could be 10 times more devastating than previous ones, with an estimated $100 trillion in economic impact and 10 million deaths annually by 2050 due to antimicrobial resistance and emerging infectious diseases.Skin flora—previously considered harmless—are now increasingly resistant to biocides, similar to how bacteria have developed resistance to antibiotics. Therefore, safe, rapid, and minimally invasive IV access is no longer optional but essential.
Purpose and Advantages of the Venaican Device
Venaican is designed to offer a reliable, safe, and cost-effective alternative to traditional cannulas and current “safety” models by addressing the core failures in design logic and usability.
✅ Manual control of cannula advancement without risk of premature needle retraction
✅ Reduced number of components, simplifying manufacturing and reducing production costs
✅ Improved infection control, especially in high-turnover wards and during pandemics
✅ Minimal training required, supporting self-cannulation in cases of highly contagious skin or systemic infections
✅ No delay in drug administration during medical emergencies
✅ Suitable for low-resource healthcare settings needing scalable, single-use sterile solutions
The device is designed for single use, manufactured using medical-grade polymers and stainless steel, and can be sterilized prior to packaging for global distribution.
Advantages Over Prior Art:
Fewer components, reducing assembly and sterilization costs
Integrated safety mechanism for automatic needle retraction and lock
Fast cannulation with visual blood flashback confirmation
No external plungers or telescopic tubes, enabling compact design
Compliance with WHO, CDC, and OSHA safety guidelines
Component Reference List:
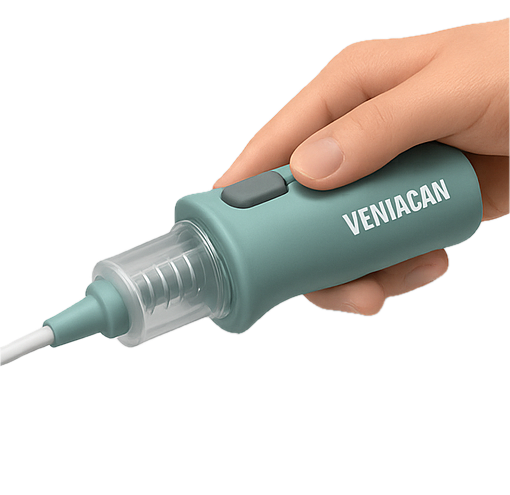
Body (1): Main cylindrical housing that contains the internal components.
Needle (2): Hollow introducer needle attached to the blood collecting chamber.
Blood Collecting Chamber (3): Transparent chamber to confirm venous access.
Spring (4): Compressed coil spring mounted around the needle, providing the bias force.
Plunger (5): Movable element used to compress the spring and advance the needle.
Cannula: Flexible tube placed over the needle to remain in the vein.
Retainer/Lock Mechanism (Blue/Red tabs): Prevents premature movement of cannula or needle.
Stopper or Recoil Mechanism (not numbered): Ensures needle locks inside the body after retraction.
Operation Steps (As per the Drawing):
Initial Setup: The body (1) houses the needle (2), which is fixed to the blood collecting chamber (3). The spring (4) is loaded over the needle, and the cannula is placed concentrically over the needle after the plunger (5) is inserted into the body.
Pre-Tensioned Spring Configuration: The spring is compressed and held in place using a locking mechanism (retainer), establishing a biasing force as described in your original USA patent.
The device is ready for insertion.
Insertion into Vein:
The needle with the cannula is inserted into the vein. As soon as the blood enters the chamber (visual flashback), this confirms correct placement.
Cannula Advancement:
Upon flashback, the user activates a release mechanism (e.g., sliding the blood chamber knob forward or pressing a trigger), which collapses the spring, pushing the cannula forward into the vein automatically. This eliminates the need for manual advancement, improving precision and reducing vein trauma.
Needle Retraction: Once the cannula is in place, the user pulls back the blood chamber. The needle, attached to it, retracts into the body. The spring ensures it locks safely into a sealed compartment.
Post-Use Safety:
The needle is completely retracted and locked within the housing, preventing accidental exposure and ensuring compliance with modern sharps safety standards.
Key Innovations Over Prior Art:
Single-Action Cannula Insertion and Needle Retraction: Triggered by blood confirmation, ensuring timing accuracy and reducing operator error.
Integrated Flashback Confirmation with Mechanical Bias Activation: Enhances procedural reliability.
Manual Retraction Mechanism with Locking Housing: Minimizes needle-stick injury risk post-procedure.
Manufacturable Design: Simpler components for easy production and assembly using standard medical-grade plastics and springs.
The world of medicine prides itself on innovation—but when it comes to intravenous (IV) access, we are stuck in the past. The "Safety IV Cannula" has long been marketed as a modern solution for patient safety. But beneath the glossy marketing lies a stagnant technique that has not addressed the biggest pain point in cannulation: successful insertion on the first attempt.